
ERA-UTX Installation Guide: Push Button and Door Contact Mounting Instructions
Step-by-step instructions for mounting your ERA-UTX as a push button or door/window contact.
Published December 14, 2022
The ERA-UTX transmitter offers dual functionality as both a push button alert and a door/window contact sensor. This guide covers the physical mounting process for both configurations. Note: If you're only using the push button feature, you won't need the magnetic contact component.
Push Button Installation
Required Materials
- ERA-UTX transmitter unit
- Mounting bracket
- Two mounting screws (included)
- Silicon grommets for outdoor installation
- Power drill
Mounting Steps
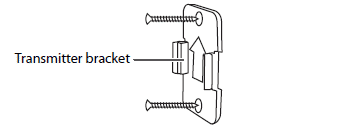
- Bracket installation: position bracket with arrow pointing upward, mark drill holes, secure using provided screws
- Weatherproofing (outdoor): insert grey silicon grommets, ensure complete coverage of screw holes
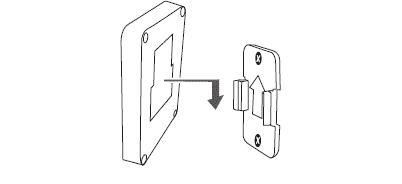
- Final assembly: align transmitter with bracket, slide unit downward until secure
Door/Window Contact Installation
Positioning Guidelines
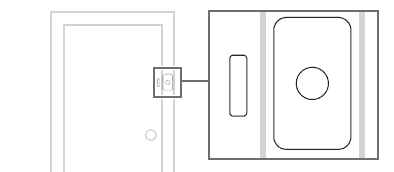
- Maximum gap: 1/2 inch between transmitter and magnetic contact
- Align components for proper magnetic connection
Installation Process
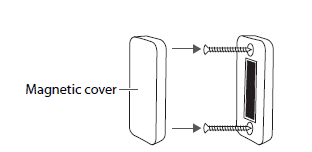
- Magnetic contact installation: mark screw positions, drill pilot holes, secure with provided screws, attach cover plate
- Transmitter mounting: position bracket with arrow up, install mounting screws, add weather protection, slide transmitter onto bracket
Weather Protection Tips
- Always use silicon grommets for outdoor installations
- Verify complete sealing of all screw holes
- Position unit to minimize direct weather exposure
Where to go next
When this article answers part of your question, use these links to choose a receiver, find your product family, or browse the full catalog.
Browse FAQ categories
Jump straight to the product family and topic you need.
Learn moreBrowse all documentation
Open the full manual and article library when you need adjacent guides, wiring notes, or compatibility references.
Learn morePreview receiver sounds
Compare tones, sirens, and strobe-linked alerts before choosing a receiver or system.
Learn moreRead broader guidance
Move from the product-specific article into broader buying and troubleshooting guides when the issue spans multiple models or installs.
Learn moreReturn to the product catalog
Head back to the catalog once you know which family or alert type fits the job.
Learn moreGet expert help
Reach the Safeguard team when the next decision still needs a human recommendation.
Learn more